Saturday, December 31, 2011

November UFO

I've finished another quilt at the eleventh hour. This was the UFO for November. I had a hard month and did very little quilting, so I thought I would make the effort to finish it by the end of the year. And I did! So I finished all twelve of my UFOs, not exactly on schedule, but close.

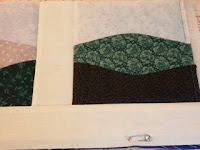
This is a detail of the quilting. The border consists of cotton squares with a sheer polyester squares superimposed on them. It seemed like a good idea at the time. Making a binding out of sheer polyester was a real challenge, but I did it. Happy New Year!

Thursday, December 29, 2011

Bastrop quilt top

I made the inside of this quilt top many years ago. I invented a quick piecing method to generate reversed squares. The four-triangle blocks were quick pieced but planned in a way that would place triangles of the same color around every square. It was a complicated method, but I gave a workshop at the Herring Run Quilt Guild anyway. Someone actually made one of these by following my directions. I have made several, but this was the largest. The original piece was longer, so I removed a few rows to save a bit for myself.

This top was shifted among various boxes and drawers for about 20 years. When I heard that Judy Laquidara was volunteering to put together quilts for the people of Bastrop, Texas who lost their homes in the fires this summer, I decided to finish the top according to her specifications and send it to her along with a backing and binding. I thought this would take half a Saturday in September, but I underestimated how long it would take to assemble the parts. I had to find an appropriate border, which was hard, because colors and styles have changed in twenty years. But here it is, ready to go.

Here are the backing and binding in the shipping box. I am going to buy a nice batting to pack it up tight, and ship it to Judy in Texas tomorrow.

Wednesday, December 28, 2011

December UFO

I bought this quilt top at a flea market in Arkansas when my little sister was working there many years ago. It was musty so I washed it, and it started to fall apart. So my intention was to pick apart the seams that were not sewn well and sew them back together. This ended up being almost all of the seams. My project for 2011 was to finish putting it back together, and I've done that. It is a wild and crazy strip quilt. I like it very much; I hope to quilt it someday and keep it for myself.

Friday, December 23, 2011

Tie-dyed towels

I made tie-dyed towels for Christmas gifts for my kids and my nieces and nephews on my husband's side of the family - eight total. Three of them are wrapped already. I used up the rest of my dye plus some yellow, turquoise and red that came in the kit I had to buy in order to get soda ash. It all worked out for the best. I was out of yellow anyway, and turquoise is such a great color for tie-dye. I had some nice purples, dark blues, orange, and subtle greens. Next time I tie dye I will have all new colors.

Saturday, December 17, 2011

Tie-dyed Socks

These are nine pairs of tie dyed socks that I made for my nieces and nephews. The cuffs came out well, but the foot was washed out. The socks were 80 percent cotton 20 percent polyester, however the polyester was all on the outside of the foot. Inside, the socks are all cotton and brilliantly dyed. Next time I will find 100 percent cotton socks. At any rate they are nice and I hope the kids like them.
I added an origami wallet containing a twenty dollar bill to each gift box.

Friday, November 4, 2011

October UFO

I was going to finish this quilt in October - really I was. But our power was out from October 30th until late at night on November 2nd. So I quilted this yesterday and finished sewing the binding today.


The name of the quilt is "New Orleans." I started it after my first trip there with a group from my church in 2007. We were one of the first groups to restore a home after hurricane Katrina so that the owner could move back in. The pattern is a single Carpenter's Wheel block. Originally the center eight-pointed star consisted of the monochromatic lavender fabric of the outer points, but this was swapped with the floral fabric (tediously) in order to balance the composition.

Saturday, October 22, 2011

Charity Quilt Tops

At last week's church quiltathon I put borders on the charity quilt tops that I made earlier this year. Peter went with me and cut the fabric for the borders. The one on the top right had been partially quilted, and I finished quilting it at the quiltathon. This started out as the Roman Square Project that I posted earlier this year.

Hot Pink Knitted Quilt

I've made another knitted quilt, and I can't wait to start the next one! This one didn't take very long to knit at all. Changing colors adds interest and removes the boredom of knitting a large flat square. I used the same pattern as one I made this summer.

Friday, September 30, 2011

September UFO finished

...at the last minute of course. This picture was taken before I put the binding on, but today I put the binding on, and I just clipped the last thread a few minutes ago (11:15 p.m. my time). It is just under four feet square. The fabrics I used are: a few traditional cotton quilting fabrics, lamé, glittery net, a few different sheer and satin fabrics, silk, gilded kid leather, corduroy, velvet, microsuede, and chiffon. It was inspired by a sheer nylon quilt I saw in a book by Yoshiko Jinzenji. I pulled the book out today and saw that it was published in 2003. That was about when I started this quilt. After I got the top together, one of the lame fabrics shredded. So I had to pluck out 52 squares and replace them with a stabilized version. I could not quilt it at the time, so I considered myself defeated. This time I built a frame to quilt it. I backed the quilt with sheer fabric and pinned the top to the backing with straight pins. I taped the backing to the frame and stitched every row in the ditch. In this picture it is slightly backlit, hanging from a rafter in my sewing room. The detail shows some of the sheer fabrics.

Sunday, September 18, 2011

Grange Fair

This is an origami box that I folded both to enter in the fair and to donate to the auction. It didn't win a ribbon, but I wanted to take a picture of it because it was sold - I learned at church today that it was bought by a very enthusiastic little girl who also entered lots of craft items.
This is the necklace that Cathy made me for my birthday. She was so excited that it won a blue ribbon.
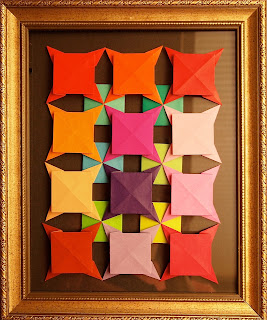
My origami quilt won a blue ribbon. I donated this to the auction too. All of my origami is from the designs of Tomoko Fuse. She has written many books on origami boxes, one on origami quilts, one on unit origami, and one on kusudama. Probably many more too. She also has founded a company that makes origami picnic bowls, cups, and plates.
This is the origami quilt that I had made for the fair, but I could not muster up the energy to put it in a frame. The one I did enter was already framed. In this picture it is sitting on the glass. At some point I will frame it. So, it is still mine to have. I'm glad because I liked it a lot.
Finally here is a tie-dyed handkerchief that I entered at the last minute. It also won a blue ribbon in the "crafts" category. In this picture it is hanging up at Sandy Island family camp, where I made it.
Three items that I've previously posted on this blog also won blue ribbons. I'm almost embarrassed to tell because the only quilts entered in the fair were my two quilts! But they were some of the best quilts I've made. I'm sure their presence at the fair delighted many people. But I wish there had been more competition. I would never have finished my hidden wells quilt (not quilted in the picture) this soon if not for the deadline that I set for myself, to have it done for the fair. The other quilt I entered was my big fall colors quilt, and the third item was the knitted roman squares blanket that I made for our church's charity blanket project.

Tuesday, September 6, 2011

Lazy day half-square triangles

I was too lazy this Labor Day weekend to work on the really hard quilts that I would like to be finishing. These blocks are actually quite small - the one on the left is about two inches square. Maybe someday they'll all be part of an interesting pieced border.

This one is about eight inches square. It's loosely based on the Year's Favorite quilt block. It will go into my block box, which is filling up nicely. Then someday I'll make another couple of quilts like Cindy's and Cathy's.

Friday, September 2, 2011

Dual Boston Commons Quilts

These dual Boston Commons quilt tops were made with the same fabrics in each (the colors are different because the pictures were taken at different times of day). Each quilt is approximately 42 x 54 inches. This is the size we use for our church charity quilts. I have always wanted to make a Boston Commons quilt, and of course I wanted to strip piece it. Because there are different numbers of squares of each color, the only way to make strip piecing work is to make two of them. It turns out these are much easier to strip piece than the dual trip around the world quilts, which I tried to explain here. If there are any problems or questions about these instructions, please leave a comment.

Choose eight fabrics - selvage to selvage (not fat quarters). You will need more than 1/2 yard - at least 5/8 yard. Number the fabrics 1 to 8. In this picture, number 1 is on the left and number 8 is on the right. Number 8 will be the fabric that forms the "border."

Cut four strips 4 3/4 inches wide from selvage to selvage of fabrics 1 to 7.

Cut four strips 5 1/2 inches wide from fabric 8. The extra width is needed for the additional seam allowance along the diagonal.

Sew half of the strips in pairs: 1 & 2, 3 & 4, 5 & 6, 7 & 8, so that there are two pairs of each. Note: either press all seams towards odd numbered fabrics, or press all seams towards even numbered fabrics.

Sew the other half of the strips in pairs: 2 & 3, 4 & 5, 6 & 7, 8 & 1.

Cut the first set of pairs into two halves, each slightly longer than 19 inches. Sew them together so that there are four different sections with the fabrics in the following order:

1 - 2 - 3 - 4 - 5 - 6 - 7 - 8
3 - 4 - 5 - 6 - 7 - 8 - 1 - 2
5 - 6 - 7 - 8 - 1 - 2 - 3 - 4
7 - 8 - 1 - 2 - 3 - 4 - 5 - 6

This is a picture of those four sections, overlapped, from top to bottom.

Cut the second set of pairs into two halves, each slightly longer than 19 inches. Sew them together so that there are four sections in the following order:

2 - 3 - 4 - 5 - 6 - 7 - 8 - 1
4 - 5 - 6 - 7 - 8 - 1 - 2 - 3
6 - 7 - 8 - 1 - 2 - 3 - 4 - 5
8 - 1 - 2 - 3 - 4 - 5 - 6 - 7

Cut four strips from each section, 4 3/4 inches wide. Arrange them so that the top row starts with fabric #1, second row starts with fabric #2, etc.

Sew the rows together. Not all the cross seams will match up, because fabric 8 is wider. Note: don't press seams, or press seams lightly all in the same direction. When the quilts are assembled, we will want seams to alternate pressed towards odd numbered rows on one quilt and even numbered rows on the other quilt. We have to cut the panels apart first.

Cut the panels apart along the diagonal. The cut should go straight through the middle and should be 1/4 inch from the points of the squares on either side.

Arrange four identical triangles so that the center squares of the side triangles overlap, and the end triangles match up. Decide on the best arrangement and remove one square from one of the sides. Open the seam between rows about an inch and a half more than is needed to remove the block.

Now the large triangles will be sewn together. Make sure that the point where the 1/4 inch seam allowances meet lines up with the seam between the last square and the end triangle. Mark the seam allowances if you have to.
Sew the two end triangles to the sides of the side triangle that has the center removed. At this point you can figure out which way to press the long seams so that the cross seams interlock.
Sew one edge of the remaining side triangle to the edge of the other side that was detached when the center square was removed.
Sew the last pair of inside edges together.

Cut off the corners.
Repeat this with the other four triangles, and you have two beautiful quilt tops.

Thursday, September 1, 2011

August UFO

I finished this today - a day late I suppose. But it is done. I chose the colors from a book of style palettes. This is the antique postcard / hand-tinted photo palette. I hand and machine quilted in the ditch, and stitched a large meander around the border. The border fabric was left over from my sister's curtains many years ago in Lansing, Michigan.
Posted by Picasa

Sunday, August 21, 2011

Knitted Roman Squares

This is the fourth blanket I've knitted for Project Linus. A group at my church knits these blankets and turns them in to Project Linus, which distributes them to babies and kids in need of the comfort that a handmade blanket can provide. Our group is generating a lot of small balls of yarn, so I made this blanket using short lengths of yarn. I knit it as one piece, joining in the strands as needed and twisting the strands when I changed colors across the row. I measured the length of the strand that I would need ahead of time - twice the length of my outstretched arms - and arranged the strands before I added them into the quilt. The stitch throughout is seed stitch - (k1 p1) and repeat on the right side on an even number of stitches, p1 k1 wrong side.

Sunday, July 31, 2011

July UFO is finished

This quilt was not the one drawn for July, but I made the switch because I knew I was going to be at my mom's house until mid-August, and there is no sewing machine there. This was the only remaining UFO on my list that just needed hand quilting. I partially quilted this quilt and put the binding on it so it could be in a quilt show in March 2002.
       Most of the hand quilting on this quilt is "in the ditch," one of my favorite hand quilting techniques. I love the way the fabric speaks for itself, the way the quilt flattens out and the way the lines straighten up when I stitch along the seam lines.
       The left side panel consists of four large blocks. From top to bottom, they are some kind of basket, a Penrose tiling, a state capital block called "Sitka" (the old capital of Alaska), and an eccentric star.
       The right side panel consists of four blocks. From top to bottom, they are a reversed squares block using a quick method I invented, a hidden wells block, a larger Penrose tiling, and a broken dishes block.
       The top and bottom rows of the center panel are double pinwheels. Cathy chose the fabrics for these. Along the left side of the center are six smaller blocks. Four are extra blocks from baby quilts I made for my kids, and the lower two are blocks made from leftover scraps of other quilts.
       The large block at the top center was a color study I made when I was taking classes from the late Kathleen Weinheimer. The center block is another state capital block, though I don't remember which state. The bottom center consists of four blocks - a nine-patch designed by Cathy, the one that says "Cathy," and two Cambodian applique blocks that I bought at a quilt show.
       Along the right side of the center panel is a Christmas mouse that I bought at Keepsake Quilting at my first visit there in the early 1990s. I made a Christmas wall hanging for my aunt, who loved mice, from the other mice in that pattern. The other blocks are another nine-patch designed by Cathy, some batik butterflies, another Cambodian block, and a sunshine and shadow block also designed by Cathy.

Sunday, July 10, 2011

Quilty knitting

I finished a baby blanket for Project Linus last week at family camp. They wanted more blankets that were suitable for boys, and I thought the magenta and earth tone variegated yarn that they had donated to our knitting group might work. The pattern I chose needed more yarn than there was of the variegated yarn, so I used a compatible solid for the center of the blanket.

This is a close-up of the test patch for the next blanket, which will use up odds and ends of yarn. It's a seed stitch with each square 15 stitches x 24 rows, which comes out more or less square.

Cindy's Tote

I have to admit I cling to stuff - but thankfully, my kids don't. Cindy cleaned out her tote bag today and found an old pop tart at the bottom of it, among other things. In this picture you can see the brightly colored straw has worn off as well. So I found her a new tote and asked her with feigned casualness whether she wanted to throw it out. "Sure," she said. Well I have been all over the world with Cindy and her tote bag, and I had to take a picture of it before wistfully placing it in the laundry room trash can.

Friday, July 1, 2011

Eccentric Stars

I've always liked this block. I found out last month that it's called Eccentric Star. I had a couple of piles of solid squares put together with a diagonal line marked on the back of the lighter square and stored in a box labeled "cut projects to piece" for many years. After I saw the leaders and enders book, I started sewing them together at the start and end of other things I was piecing. I had enough to make these two new tops, each about 28 inches square. I wrote about this in a previous post.

I made this Eccentric Star block, 6 1/2" square, for a baby boy who is about to be born.

Wednesday, June 29, 2011

Fall Colors Quilt


Here is my finished quilt, which I have called "Fall Colors" on all the lists of unfinished quilts I've written over the last twenty years. The previous post describes some of its construction. It is a queen sized quilt, about 86" x 94".

Monday, June 20, 2011

Fall Colors Quilt Construction

I am making a two-sided quilt using a quilt-as-you-go method that I dreamed up almost 20 years ago. The top consists of six inch appliquéd blocks that represent the mountains of New Hampshire in the fall, separated by two inch sashing. The back consists of six inch squares of winter colored fabric, separated by dark blue sashing. This picture shows the first four rows of the project completed, plus the back of the next six rows (the front rows are hiding underneath). Read more and you will understand why I put this project off for so long.
In order to keep myself from running away screaming, I'm putting together a little top in between seams using the leaders and enders method. (Read about this on the Quiltville web site.) I had marked some solid squares on the diagonal to make into half-square triangles, also quite a few years ago. The squares sat in a box labelled "cut projects to piece" for a long time. I don't know what I had in mind back then, but once I heard about the leaders and enders method, I started putting them together and ended up with enough squares to make two wall hangings with nine eccentric stars in each one.
I am sewing strips of six inch blocks, joined by two inch sashing, to strips of batting. I will sew the top and back strips to the batting along each seam, front and back, at the same time. Here are the batting strips, cut as precisely as I could manage, folded and labeled on my cutting table.
Here is my diversion, waiting to be trimmed so I can continue piecing the eccentric stars as I go along.
In this picture, I fold back the back strip, smooth it down and pin it to the batting. I have already joined the front and back strips to the batting on the left side - that was the first step, and it's not shown. The strip is upside-down in this picture.
Here I turn the strip over and line up the top strip as best I can. The batting doesn't shift and the blocks are the same size, so this usually works out pretty well. Notice that the seams are already sewn together. When I first started putting this quilt together, I tried putting the loose squares and sashing strips onto the batting, and sewing them all together at once. This did not work at all. So I took everything apart and pieced all the rows first.
I have a "leader" in the machine already...
...so that I will not have loose threads at the start of the seam.
Now I add the "ender" which will stay in the machine and become the leader for the next seam. Note there is a bit of extra batting at the bottom of the strip. That is for the long strip of sashing between rows.
When I remove the strip, I cut off the "leader" and put it aside.
I repeat this step once for each seam - 18 times total including left and right sides. Here is a finished row.
When I finished this row, I could not resist feeding the rest of my leader/ender pairs through the machine so that I could iron them and get them ready to finish.
I will have nine eccentric star blocks when I make the next row.
Now I attach the sashing where this row will join to the next. I attach the front first, and then the back (I didn't show this step).
Because I sew the seams with the front on top, the front scootches down about 1/8 inch. I don't want to use the walking foot, so I just live with this. It actually works out well. But the double seam at the top comes from the fact that when I sew the long sashing to the back side, the seam comes out in a different place. So the top sashing will end up shorter than two inches. Because of this I have to trim the top sashing to make sure it's straight, and I have to trim 1/8 inch off of the batting too. It sounds like extra work, but it seems to me that it's inevitable. The nature of this process causes the work to shift some, and this is the step where I have to make some corrections.
In the picture above I've also made marks on the long sashing, using a blue water-removing marking pen, that will help me line up the vertical sashing with the next strip. This is very important. I didn't do this between strips one and two, and I think I will have to pick it out and do it over.
Now I am ready to quilt. I pin the sashing together so it doesn't get caught in the machine.
Originally I was going to do some very decorative machine quilting. I was going to do different colored random paths in each colored section, and free-motion leaves on the sashing. I actually did two strips this way at some point. I might have gone on like that but the batting deteriorated and I had to take everything apart. Now that I have only a month to finish this, I decided to use the decorative stitches that my old machine can do and just make a line of variable zig-zag along the tops of each "mountain." The mountains were supposed to be continuous from one block to the next, and this choice of quilting really brings that out. Plus it only takes about ten minutes, and it's easy. Necessity is the mother of invention. I am not quilting the sashing. Because I sew the front and back to the batting along all seams, there is already some quilting done in that step. It is good firm batting, so there won't be any problem. I can probably even wash and iron the thing when it's done.
I have just sewn the long sashing on the bottom front of the previous row to the top of this row. I didn't show that step. Now I've turned the whole quilt over and I'm joining the batting with a herringbone stitch. I just catch the battings from behind, alternating on each side.
The final step is to fold the back sashing over and tack it down with a blindstitch. This is somewhat time-consuming, but it looks great.
So now I have five rows done! There are ten rows in all, plus borders - I should be done in a week, in time for the June 30th deadline. I plan to finish one row per day except Wednesday and then the borders next Sunday.

One final note - After I finished row five, I was so eager to piece my eccentric stars, that I got a head start on row six. All I need to do now is quilt it and attach it to row five.